CSS List & Table
Table of contents
List
List Properties
list-style-type
리스트들의 마커종류를 고름
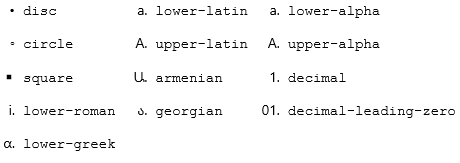
* list-style-type: disc * list-style-type: circle * list-style-type: square * list-style-type: none * list-style-type: lower-roman * list-style-type: upper-roman * list-style-type: lower-greek * list-style-type: lower-latin * list-style-type: upper-latin * list-style-type: lower-alpha * list-style-type: upper-alpha * list-style-type: decimal-leading-zero * list-style-type: decimal (1,2,3...)list-style-position
마커의 위치 지정
  list-style-position: inside
  list-style-position: outside
list-style-image
내가 지정한 이미지로 마커 이미지 변경
list-style-image: url(images/bullet.png);
Shorthand List property
list-style: type position image(“”) 순서로 진행됨
만약 하나의 값이 빈다면 기본값이 자동으로 들어감
ul {
  list-style: square inside url("sqpurple.gif");
}
List Decoration
Remove Default Settings
  ul {
    list-style-type: none;
    margin: 0;
    padding: 0;
  }
List Navigation
기본 모양
<ul> <li><a href="#home">Home</a></li> <li><a href="#news">News</a></li> <li><a href="#contact">Contact</a></li> <li><a href="#about">About</a></li> </ul>active된 네비게이션은 hover되어도 색변화 없게
  li a:hover:not(.active) {
    background-color: #555;
    color: white;
  }
히든 네비게이션 만들기(웹접근성)
네비게이션 바로가기 tab 이동이 안될때
<div id="nav"></div>에css로 #nav {width: px;} 값을 준다
 #skipNav{
     position:relative;
     width:100%;
     overflow:hidden;
 }

 #skipNav a{
     display:block;
     height:1px;
     margin-bottom:-1px;
     overflow:hidden;
     text-align:center;
     text-decoration:none;
     color:#333; font-size:12px;
 }

 #skipNav a:hover, #skipNav a:focus, #skipNav a:active{
     display:block;
     height:auto;
     padding:5px 0;
     background:pink;
 }

 ---html---

 <div id="skipNav">
     <a href="#content">본문 바로가기</a>
     <a href="#nav">글로벌 네비게이션 바로가기</a>
 </div>
Table
Table Properties
border
사용가능한 요소 :
<table>, <th>, <td>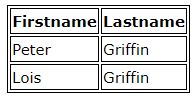
  table, th, td {
    border: 1px solid black;
  }
▸ border-bottom과 같이 부분만 할수도 있음
border-collapse
사용가능한 요소 :
<table>table { border-collapse: collapse; }border-spacing
distance between the borders of adjacent cells
▸ collapse와 반대되는 속성, border-collapse: separate;이여야함 (default)
  border-spacing: 15px;

  or

  border-spacing: 15px 50px;
text-align
sets the horizontal alignment (like left, right, or center) of the content in
<th>or<td>▸ 기본적으로 th는 가운데정렬, td는 왼쪽정렬
vertical-align
sets the vertical alignment (like top, bottom, or middle) of the content in
<th>or<td>▸ 기본적으로 th, td는 중앙정렬
width, height
padding
Table Decoration
Hoverable Table
tr:hover {background-color: #f5f5f5;}Striped Tables
tr:nth-child(even) {background-color: #f2f2f2;}Responsive Table
컨텐츠를 다 담을 수 없으면 가로 스크롤바 생성
  <div style="overflow-x:auto;">

  <table>
  ... table content ...
  </table>

  </div>
Form
Form Decoration
padded input
padding사용
▸ box-sizing도 사용해야 width값이 복잡해지지 않음
focused Inputs
  input[type=text] {
    width: 100%;
    padding: 12px 20px;
    margin: 8px 0;
    box-sizing: border-box;
    border: 3px solid #ccc;
    -webkit-transition: 0.5s;
    transition: 0.5s;
    outline: none;
  }

  input[type=text]:focus {
    border: 3px solid #555;
  }
input with icon/image
왼쪽에 아이콘이 있는 input
  input[type=text] {
    background-color: white;
    background-image: url('searchicon.png');
    background-position: 10px 10px;
    background-repeat: no-repeat;
    padding-left: 40px;
  }
Animated Search Input
  input[type=text] {
    width: 130px;
    box-sizing: border-box;
    border: 2px solid #ccc;
    border-radius: 4px;
    font-size: 16px;
    background-color: white;
    background-image: url('searchicon.png');
    background-position: 10px 10px;
    background-repeat: no-repeat;
    padding: 12px 20px 12px 40px;
    transition: width 0.4s ease-in-out;
  }

  input[type=text]:focus {
    width: 100%;
  }
Styling Textareas
textarea { width: 100%; height: 150px; padding: 12px 20px; box-sizing: border-box; border: 2px solid #ccc; border-radius: 4px; background-color: #f8f8f8; resize: none; }Styling Select Menus
  select {
    width: 100%;
    padding: 16px 20px;
    border: none;
    border-radius: 4px;
    background-color: #f1f1f1;
  }
Styling Input Buttons
  input[type=button], input[type=submit], input[type=reset] {
    background-color: #4CAF50;
    border: none;
    color: white;
    padding: 16px 32px;
    text-decoration: none;
    margin: 4px 2px;
    cursor: pointer;
  }

  /* Tip: use width: 100% for full-width buttons */
버튼에 이미지 추가하기
  <button>
      <img src="https://www.placehold.it/50" alt="" width="50" height="50">
  </button>
<button> <img src="https://www.placehold.it/50" alt="" width="50" height="50"> </button>클릭한 색상 따라서 즉시 화면 색상 변경
  <form action=""> onchange="document.body.style.color=this.value"
      <input type="color" value="#00bfff" onchange="document.body.style.color=this.value">
  </form>